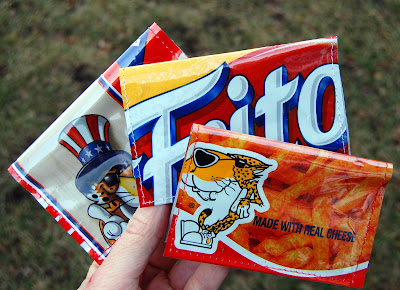
Snack Wrapper Wallets
Sweet Cheetos wallet, dude!
Recycled chip bags or snack wrappers make cool two-pocket wallets big enough to hold gift cards, business cards, notes, small photos, or cash. Want to make one of your own? Here's how:
MATERIALS:
- Empty chip bag or snack wrapper (foil lined or plasticky ones work best)
- 1/4 yard medium weight clear vinyl (purchase in home dec section of fabric store)
- All purpose/dual duty sewing thread
TOOLS:
- Self-healing cutting mat
- Rotary cutter or sharp craft knife
- Sewing machine
- Non-stick presser foot, walking foot, or regular presser foot along with frosted cellophane tape
- Size 80/12 or 90/14 sharp sewing machine needle
- Quilting clips, small binder clips, clothespins or other small clips to hold layers together
MAKE A TEMPLATE
If you are making more than one or two wallets, consider making a set of templates from clear, heavy duty quilting template. (Find quilting template plastic sheets in the quilt section of your local fabric store.) Use the templates to either mark the pattern pieces on the bag with a permanent marker, or cut around the templates directly on the chip bag with a rotary cutter or sharp craft knife. Since the templates are see-through, you can center the pattern pieces directly over the most interesting parts of the chip bag. Otherwise, draw the pattern pieces from the measurements below on to the snack bag with a permanent marking pen, or make a template from card stock or cardboard.
CUT YOUR PATTERN
Using these measurements (or a template as mentioned above) cut one main pattern piece for the outside of the wallet and two small wallet pockets. Cut two sets, one from the snack bag and one from the clear vinyl.
- Outside wallet - cut 1 rectangle 6 1/4" X 4 1/2"
- Wallet pockets - cut 2 rectangles 2" X 4 1/2"
GET READY TO SEW
Sewing with clear vinyl can be tricky business. The shiny vinyl can "stick" to your presser foot while you sew, causing problems with the stitches. There are a few ways to get around the stickiness of the vinyl. You can use; a non-stick presser foot, a walking foot, or you can place a piece of frosted cellophane tape on the bottom of your regular presser foot.
My weapon of choice is the non-stick presser foot - it works great to glide right over the vinyl. Also make sure to set your stitch length between 3.3 - 3.5 mm when sewing this project. Shorter stitches can act like perforation marks on the vinyl.
STITCH IT UP
Don't use pins on this project, they will leave permanent holes in your wallet. Instead, use quilting clips, small binding clips, or clothespins to hold the pieces together as you sew.
Begin with the two pockets. Layer one piece of vinyl on top of the chip bag pattern piece and stitch along one long side 1/4" away from the edge.
Using a cutting mat and a rotary cutter or craft knife, cut the stitched edge to about 1/8" away from the stitching.
Next, layer the large piece of vinyl and the outside of the wallet facing down, then place the pockets on each side of the inside of the wallet. The pockets are placed so the sewn edge faces the center of the wallet and the unsewn edges line up with the outside edges of the wallet. Use clips to hold all of the pieces together firmly as you sew.
Stitch all the way around the outside edge of the wallet 1/4" from the edge. Backstitch one or two stitches when beginning and ending your stitch, and pivot around each of the four corners.
After stitching around outside edges of wallet, use a ruler and rotary cutter or craft knife to trim outside edges to 1/8" of stitching. Then fold wallet in half, pressing a sharp crease down the center fold.
Open, and stitch along the crease line, backstitching one or two stitches when starting and ending the stitch.
Trim the excess threads from the ends. This line of stitching will help the wallet stay folded and hold the layers together.
And there it is. Now, what's going in YOUR snack wrapper wallet?


Comments