Clear Vinyl Mini Zip Pouch Tutorial
I needed a small zip pouch to corral my mechanical pencil leads, and I couldn't find any floating around our house. Most tutorials for making clear vinyl zip pouches include sewing seams inside the pouch, then turning it inside-out. This works well if you have a very thin gauge vinyl, but doesn't work with thicker gauges.
I created a mini zip pouch with the thicker clear vinyl I had on hand. This is a super simple way to sew mini zip pouches with thicker vinyl that doesn't include the step of having to turn it inside out. It's not fancy, but it's functional! Here's how you can make one, too:
You will need one piece of 16 or 20 gauge clear vinyl cut in a 4.5" x 7" rectangle, one polyester or nylon coil separating zipper at least 7" or longer in a bright color, a bright colored 100% polyester thread, clips, thread snips, and Fray Check. You will also need a leather sewing needle size 90/14.
Open the zipper, and clip one short end of the vinyl rectangle on top of one side of the zipper tape. Align one end of the clear vinyl about 1/4" over from the end of the zipper and about 1/8" away from the teeth. If you push the vinyl too close to the zipper teeth, the zipper may stick when opening and closing.
Use a non-stick foot if you have one for you sewing machine. Yes, there are BERNINA non-stick zipper feet available, but I'm just using the Zigzag foot with non-stick sole #52D that works with the Dual Feed feature on my B 570 QE.
If you don't have a non-stick foot, you can use the age-old method of placing a piece of clear, matte finish cellophane tape on the underside of your presser foot. Works like magic!
Move the needle position over all the way towards the teeth end of the zipper, in this photo my needle is far right. Increase your stitch length to 3.0mm.
Stitch the vinyl to the zipper tape.
Make sure the vinyl is in the same position on both sides of the zipper. Close the zip, match the other short end of the vinyl rectangle on the other side of the zipper tape, and clip to hold in place.
Carefully open the zip, and finish clipping in place. Remember to clip the vinyl about 1/8" away from the zipper teeth. Sew the vinul to the other side of the zip tape as in the previous step.
Next, switch to a zigzag stitch. A standard zigzag works perfectly for this step, and will secure the end of the zipper tape inside the pouch from flopping around when you're storing stuff inside. Sew on top of the vinyl, aligning the center of your zigzag foot along the finished edge of the zipper tape. Complete this step for both sides of the zipper.
This is now what each side of the zipper should look like.
Flip the vinyl over with fabric side of the zipper tape up. Use a generous blob of Fray Check on the stitching at each end about 1/4" in from the side of the vinyl. This will help keep the stitching in place after cutting off the seam allowance in the last step. Do this on each of the four ends.
Make sure you give the Fray Check time to dry completely before moving on to next steps.
Close the zip most of the way, leaving about 1" open at the end. Place the zipper towards the top of one end, anywhere from 1/2" to 1" from the edge. Clip the folded edges of the vinyl to hold in place. Use a few clips along each side.
Usually I don't recommend backstitching when sewing vinyl. If your machine doesn't precisely follow along stitches already made when backstitching, you could end up with too many holes that act as a perforation allowing the vinyl seam to tear. However, my BERNINA sews so precisely that I know it will sew exactly in stitches already made when backstitching.
If you aren't sure about the backstitch function of your sewing machine, don't backstitch at the ends in this step. Instead, leave longer tails of thread at the beginning and end of the seam. Tie a secure knot in the thread end and feed the tails back through a few stitches before cutting off the extra.
Sew a 1/2" seam down each side of the pouch. If you are confident in the stitch precision of your machine, stitch along with me. I begin stitching 1/2" down from the folded edge, backstitch to the folded edge slowly, then slowly sew forward. I carefully backstitch over the zipper teeth, and also backstitch several stitches when reaching the other folded edge.
After stitching the side seams, trim seam allowance to about 1/8" close to the stitches. Be careful cutting the zip teeth with a rotary cutter, it will mess up your blade! I carefully cut from each size of the zip teeth with a rotary cutter and finish off with scissors.
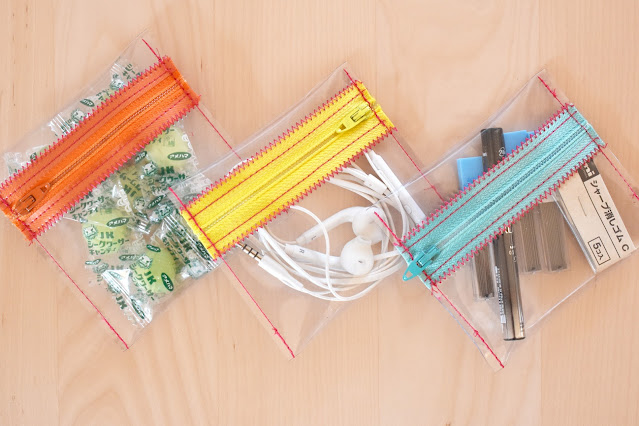
That's all there is too it! The little pouch I made fit my pencil leads and extra erasers perfectly.
These little zip pouches are also the perfect size for...
holding those earbuds.
Once you start sewing these it's easy to make a whole bunch.
I also made a larger pouch with this method that fits my sketchbook drawing supplies. I started with a 10" x 14" piece of vinyl and a 20" zip.
Three of the little zips also fit comfortably in the larger one. 😁
I hope you enjoy this quick clear vinyl mini zip tutorial. f you make any and share on Instagram, please tag me @erika.mulvenna so I can see your super cute mini-zips!


Comments